I must be honest and admit that I am on the fence regarding HDR. When done well, an HDR image is rich with color, depth, and detail. When not done well, an HDR image is a bizarre, over-edited scene. So why on earth would I write an article about something for which I don’t always care? Read on.
What Is HDR?
An acronym for “High Dynamic Range,” HDR is a method of combining multiple bracketed photos of the same exact scene into a final, single image displaying the greater range of light, shadow, details and depth I mentioned in the paragraph above. This technique may be applied to both digital and film imagery (with the film shots scanned onto your computer).
HDR is helpful in those situations where you have a large variation between light and shade within your composition, like my early-morning image of Bird Woman Falls in Montana’s Glacier National Park (FYI, early morning is a bit problematic when photographing in this particular location). 

An original image of an early morning capture of Bird Woman Falls, Glacier National Park. Rebecca Latson photo.

The HDR version of Bird Woman Falls. Note the differences in light, shadow and detail – especially within the foreground vegetation. Rebecca Latson photo.
How Is The HDR Look Achieved?
There are a number of options from which to choose when creating an image using the HDR technique.
If you shoot digitally, then you can capture an HDR image in-camera. The Canon Rebel T4i, 5D Mk III and 6D cameras each have an HDR mode within their menus that – when enabled - captures three bracketed shots and combines them into a single merged image. According to my online searches, the Pentax K-5 and K-7, along with the Nikon 5100, 7100, D600, D800 and D4 have in-camera HDR, as well. Check your own camera specs to see if you have in-camera HDR (because I’m pretty sure I’ve probably missed listing other cameras possessing this menu option). No, the Canon 1-DX does not have in-camera HDR. Go figure.
The more common method of achieving an HDR image is to photograph multiple bracketed shots (3-to-7) and then merge them via an HDR plug-in like Photomatix Pro, Nik HDR Effex, or Topaz Adjust. As with the black & white conversion programs about which I wrote in my last article, these HDR programs offer a number of presets that you can select and then tweak as much as you wish.

A photo of Glacier National Park’s Lunch Creek using three bracketed images merged into HDR using Photomatix Pro 4.1. Rebecca Latson photo.
If you don’t feel like purchasing an HDR stand-alone or plug-in program, the higher-end photo editing software programs usually have options for attaining that HDR look. Adobe’s Photoshop CS6 (and I believe also CS5) has an HDR feature within the File-Automate menu option that will combine your bracketed images. Of course, you can always try your own hand at blending together bracketed images of the same scene by copying one image atop the other, creating a layer for each image from which you can reveal and then fine-tune different parts within the final photo.
Single-Photo HDR Imagery
Do you need to capture multiple shots to create an HDR photo? No. HDR imagery may be generated utilizing a single photo. Of course, that begs the question of how you can do that when (theoretically) you need bracketed images capturing the range of light and exposure necessary for HDR.
Here’s how:
Method 1: Choose an image from your photo files and in your editing software, create two copies of this image for a total of three identical shots. Select your program’s exposure option to increase the exposure to 1, 2 or 3 in one of the images, decrease the exposure to -1, -2, or -3 in another one of the images, and leave the third image’s exposure as-is. Merge all of these images using your HDR technique of choice and voila! 

An HDR image of a portion of Balcony House, Mesa Verde National Park, created using one image from which I created two duplicates with differing exposures. Rebecca Latson photo.
Method 2: If you don’t feel like fiddling with multiple image duplications, then a program like Topaz Adjust creates that HDR look with a single photo. You select the image and this program does the rest of the work.
Issues With HDR
As I mentioned in the first paragraph, when HDR is done well, it’s really beautiful, with a richness of detail, color and depth. Oftentimes, though, the end result can appear garish and exaggerated because of editing methods and/or the HDR merging process. The image just doesn’t look natural, and that’s one of the biggest complaints photographers (including myself) have about the use of HDR.
One of the issues cropping up from time to time is the “halo effect.” When you look at the edges of an object within an HDR photo, you may sometimes see a very light-to-almost white border along the edges (the halo) ranging in severity from minimal to radioactive.
HDR and windy days are a problem. The moving branches, leaves, flowers, or grass tend to create a slight blur in parts of the photo. Of course, if you like something analogous to the “Orton Effect” (an editing method used to produce a dream-like soft blur to portions of an image), then HDR on a windy day might be right up your alley.
HDR presents a bit of a conundrum for those of you “pixel peepers” out there, totally absorbed with the minutiae of getting tack-sharp images. You see, because the HDR process consists of combining multiple images of the same scene, there is a certain amount of alignment that must be accomplished. Since we do not live in a perfect world, there might be a bit of shadowing (ghosting) from one photograph merged into/onto the other. This is especially noticeable on images where the wind is blowing the clouds; the scenery will remain the same but within your bracketed shots, the clouds will have moved (I experienced this particular issue with my own Grand Canyon HDR images).
One last issue (that I can think of) is the noise factor. By “noise” I am referring to the amount of “grain” you may see in your HDR image. This is noticeable in low-light situations or other instances using a high ISO setting. For all of these issues, however, there are fixes to be found via software (particularly for noise reduction) as well as “how-to” instructions found in HDR photography books, magazine articles and blog posts. I’ve listed a few references at the end of this article which I have found quite helpful for my own work.
Answering The Question
So, back to my original question in that first paragraph: why would I write about something for which I don’t always care?
Answer: Just because I may not always like something doesn’t mean that you won’t like it. Oh sure, you can get similar-looking images without the use of any HDR technique. I don’t argue with that. I’m just putting this technique out here for all of you because you probably enjoy stretching your “photographic muscles” to learn new methods just as much as I do and then applying them to your photography in the parks.
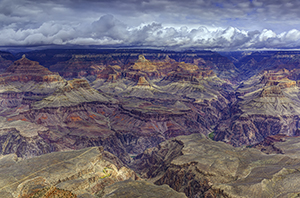
Grand Canyon colors on a stormy morning HDR image. Rebecca Latson photo.
Even when the result might not be something any of us would be particularly fond of utilizing on a constant basis, it’s still a learning process adding to one’s existing arsenal of photographic techniques. Things like this also raise the bar of what I like to call my “creativity index”. When it comes to photography, I never stop learning, experimenting, or practicing. And neither should you!
For more information on HDR, Farbspiel Photography and Trey Ratcliff’s Stuck In Customs blog sites are wonderful resources on the web, as are Rafael “RC” Concepcion’s The HDR Book and Scott Kelby’s The Digital Photography Book 4.” The June 2013 edition of Photoshop User magazine also has a great HDR “how-to” article by Sean Arbabi.