I must admit to having suffered a little bit of writer’s block concerning a subject for this month’s article.
Then, one day, while re-working some cliff dwelling images I’d photographed during a trip to Mesa Verde National Park, it occurred to me that I am surely not the only photographer encountering lighting challenges when capturing images of these Ancestral Puebloan ruins. I decided to run with this idea and, using images from my Mesa Verde trip as examples, walk through what I do when dealing with a scene containing major contrasts between light and dark.
Photographing The Cliff Dwellings
The Mesa Verde portion of the NPS.gov website has a page dedicated to cliff-dwelling photography that lists the best times of day during which to photograph specific ruins. This is quite helpful….unless you happen to be at a dwelling during the wrong time of day.
Those of you who have visited this park know that throughout the majority of the day, there is a marked contrast in light between the surrounding scenery and the shelters within which the cliff ruins reside. Your camera’s built-in light meter may read off of the day-lit cliffs with their buff-colored rocks (thus under-exposing the cliff dwelling within the overhang) or, inversely, your camera’s light meter may take a reading off of the sheltered cliff dwelling itself (in which case the cliffs, sky, and land all around the overhang will be totally over-exposed to the point of possibly being “blown out”).
Field Fixes
Although the following field fixes are not cure-alls, they can alleviate some of the light/dark issues inherent with photographing Mesa Verde cliff dwellings.
Field Fix #1: If you are using a wide-angle lens to capture a view of the entire canyon area as well as the shadowed cliff dwellings, then a graduated ND filter will, to some extent, prevent over-exposure of the horizon and surrounding lighter areas as you meter your camera specifically for the cliff dwelling.
Now, you may have heard of “center-spot” filters which have a hole or a clear center spot and a surrounding outer area that is either diffuse or colored. Wouldn’t that be the perfect cure in terms of exposing for the cliff dwelling and having the colored circular area even out the rest of the scene’s lighting? That being said, I’ve never tried these filters for myself and could not find a center-spot filter with colored edges at either of the two online photography sites where I regularly purchase my gear. I do know that those center-spot filters with diffuse edges would not darken the area surrounding the cliff dwelling – they would only blur (diffuse) it.
Field Fix #2: Fill the frame as much as possible with the cliff dwelling and thus eliminate the bulk of the brighter surrounding areas like the cliff face, sky, and ground below.
Field Fix #3: Employ the HDR (High Dynamic Range) technique to reveal details within the shadowed areas.

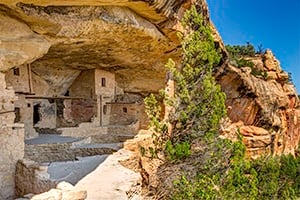
HDR image of Balcony House. Rebecca Latson photo.
This process involves the use of at least three bracketed images of the same scene to which one of the HDR methods mentioned in my previous article is applied. The resulting photo will display a higher dynamic range of light and shadow detail.
These field fixes may mitigate the issue to a certain degree, but post-processing is still required to further rectify those cliff dwelling contrast challenges. With that in mind, below is a set of post-processing steps I use in my own workflow which you might also find useful. Do remember that each photographer has his or her own editing methods, and these are mine which I share with you. I use both Adobe Lightroom and Adobe Photoshop because I find some editing tools easier to use in one program over the other.
Highlights and Shadows Sliders
Let’s imagine that I’ve just returned from another incredible day exploring the ruins of Mesa Verde National Park. My first task is to download the day’s photos to my laptop, then import them into Lightroom.
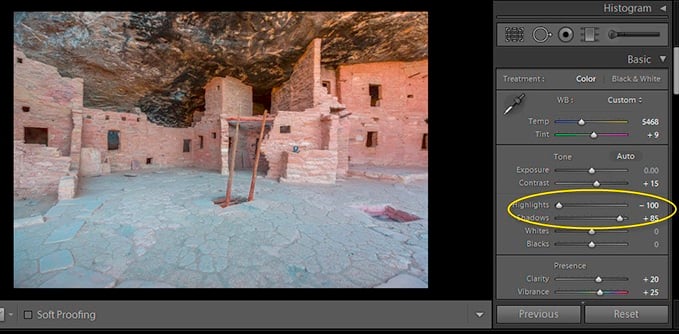
The next thing I do with each photo I edit is to move the Highlights slider all the way to the left (to -100) and the Shadows slider toward the right (anywhere from +80 to +100). This opens up the shadowed areas in my composition while revealing more detail previously hidden by bright highlights.
Since this is the routine followed for all of my images prior to making any other edits, I have created a preset (a series of commands bundled together into a single action much like a macro) combining my initial adjustments for highlights, shadows, chromatic aberration and lens correction – all with the single click of a mouse button.

A screenshot of the Highlights/Shadows slider process I use when editing an image.
The Gradient Tool
I had to amend this particular paragraph a bit because a day prior to submitting this article, I decided to upload the latest iteration of Adobe Lightroom (Version 5) onto my home and travel laptops.
Now, prior to this new upload, when the Highlights/Shadow sliders didn’t completely reduce the over- or under-exposure issues, I often utilized Lightroom’s Gradient tool to further lighten or darken specific parts of the composition. Photoshop also has a (far more detailed) Gradient tool.
After the upload of Version 5, I discovered a novel tool called the Radial Filter. Using this new tool, I now essentially have an in-computer “spot filter” to either lighten or darken whatever is outside or within the circular area I highlight.
OK, so once I have applied those few tweaks in Lightroom, I save the images and open them up in Photoshop where I continue my processing using one or more layers.
What Is A Layer?
A layer is a non-destructive editing method. Imagine a photo over which you have placed a sheet of clear, thin plastic (your layer). You can then take a felt-tipped pen and draw all over that plastic without marking up your original photo. If you goof up drawing on your plastic, you can simply replace it with another piece of clear plastic, all without disturbing your original image (and thus having to click the Edit-Undo command multiple times).
Creating and Editing With A Layer
For this article’s layers example, I’ve opened up in Photoshop an image of Spruce Tree House which has major lighting issues within the composition. I want that cliff dwelling portion of the image to show up better, so I decide to create a layer to lighten the under-exposed area of the ruins. On the right side of my screen is a set of tabs, one of which says “Layers” and is already open to reveal a thumbnail of the photo. That thumbnail (aka the “Background Layer”) is the anchor upon which my imaginary sheet of plastic (my new layer) will lay.
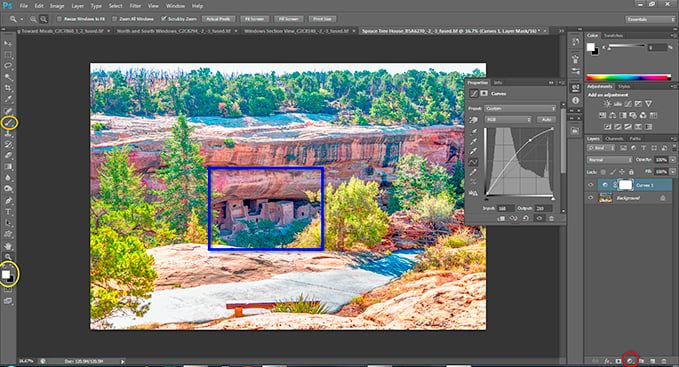
At the bottom of the Layers tab (at the bottom of the screen) is a series of icons. Hovering my mouse over each icon reveals its name/purpose. Clicking on the “Create New Adjustment Layer” icon (highlighted with a red circle in the screenprint below), I am presented with a number of options from which to choose.
I decide the Curves option is my best choice for adjusting that dark area around the cliff dwelling (the region highlighted by the blue square in the screenprint). As I move that curve upward to lighten the under-exposed portion of the image, I note that the rest of the composition is lightened too. I ignore that issue, however, since I am only focused on the cliff dwelling and will be able to fix everything else later in the edit process.

A screenshot highlighting the overall use of a Curves adjustment layer on the Spruce Tree House image.
Satisfied with my adjustment, I move my cursor over to the left side of the screen, where my toolbar (aka toolbox) resides. Although I’m not going to delve into the detailed nitty gritty of theory regarding this next series of steps, suffice it to say that these procedures set me upon the path to remedy the exposure differences between cliff dwelling and surrounding scenery in this particular photo.
1. See that little yellow circle in the screenprint? It’s highlighting the Set Foreground/Background Color icon (those two little boxes, one white and the other black). Right above that icon is a little curved double-headed arrow which I click on to switch the foreground box from white to black.
2. Holding down the Alt key, I press the Backspace key and all of the edits I made using the Curves layer have now disappeared; the photo has returned to its original exposure.
3. Once again, I click my cursor on the top of that curved Set Foreground/Background arrow to switch the little foreground box from black back to its original white.
4. Note the orange circle around that paint brush tool on the toolbar. I click on it, adjust the brush size (the bracket keys [ ] will make the “brush” larger or smaller) and am now able to “paint” over the cliff dwelling to bring back that lighting adjustment I made with my Curves layer.

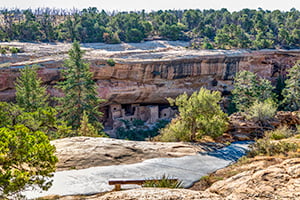
Taking the path to the Spruce Tree House. Rebecca Latson photo.
Borrowing photographer Chip Phillip’s analogy, this “painting” over an area is much like taking a coin to remove a portion of opaque film on a scratch-off lottery ticket to reveal the number beneath.
My intent with this “paint by numbers” article is to provide options which might be helpful for those of you photographing places with conspicuous light/shadow contrasts (like Mesa Verde National Park). That being said, I am a visual person and oftentimes reading about a process doesn’t click with me as much as seeing a process in action. Regarding layers editing in particular, I highly recommend watching one of the myriad video lessons available for free online or for purchase. Not only will your editing skills be raised to a new level, but you’ll know how to fix those Mesa Verde cliff dwelling exposure issues too, won’t you?


 Support Essential Coverage of Essential Places


