
Up The Trail, Big Bend National Park/Rebecca Latson.
I thought I would write a little bit about 'opposites' when it comes to your photography techniques in the national parks. Leading lines, tight compositions, and point of view are perfect examples. One method tends to add a feeling of distance, leading the viewer's eye far into the image from Point A to Point B and various parts within. Another method creates a 'Bam! Right-there-in-front-of-you' effect, and the third technique can create a feeling akin to either of the previously-referenced practices.
Leading Lines
Let's start with leading lines. I love 'em. They are a favorite photographic technique that I frequently utilize to lure the viewer into the depth of my images. Leading lines don't just guide the viewer from the composition's foreground to the background; sometimes leading lines direct the viewer to something within the image. By that, I mean your leading line may be smack-dab within your photo rather than starting from one edge and leading to another edge.
It's so easy to create this effect. You can use any sort of 'line': straight, diagonal, or curvy (steps on the trail, the trail itself, a fence, a stand of trees, a highway, stones on the ground). You name it, you can use it, as long as it is some sort of 'line.'
While many park scenes lend themselves well to giving your compositions an overall sense of distance (think about using a leading line to emphasize the wide-open spaces of some place like Big Bend National Park), there are other times when it is far more effective to create that sense of impact by drawing the viewer's eye in close to your subject for a more detailed 'inspection.' A tight shot can produce a big impression.
Tight Does Not Mean Super Close-Up
What is a 'tight shot' or 'tight image'? People often confuse tight shots with super close-ups or macros. A tight image can be both of these, but they aren't the only kinds of tight shots you can achieve. Getting in tight means you are essentially filling your viewfinder frame with your subject matter while cutting out extraneous or distracting material. I used this technique quite often during my stay in Katmai National Park and Preserve. I captured many images of the coastal brown bears standing in the rapids of the Brooks River as they fished for the migrating salmon. I wanted to focus more on the bear's face in order to capture its expression, the texture of its river-wet fur, or some facial feature like a scar. I did not want to distract the eye by having too much blue-white (sometimes over-exposed) water in the background (although I often left some bokeh'd water in the background of my tight shots to give perspective).

Another example of a tight shot scenario dealt with the blooming cacti images I captured during my spring visit back to Big Bend. While wandering around the parking area of the Chisos Mountains Lodge, I noticed a blooming cholla cactus in which a bird had built a nest. I took a photo of the cactus as a whole, and then began zooming in more on just that part of the cactus with the nest. It was the tight shot of the cactus limbs and nest that created more of an impact (for me, anyway) than the overall image of the entire cactus and nest. To my eye, it was difficult to create much of a sense of interest and/or humor with the wider-angle composition. I much more wanted to focus on the nest built around and within the sharp thorns and magenta blooms of the cactus.
As you can see from the example descriptions above, tight shots may be accomplished by moving the lens closer to your subject, or by cropping the image in the post-process stage.
Point of View ' Overhead Shots vs Ground Shots
Ok, I probably use this third practice far more with my wedding imagery than I do while wandering around photographing scenes in a national park. That doesn't mean this technique is any less effective in producing an impact by emphasizing (or creating the perception of) distance or closeness.
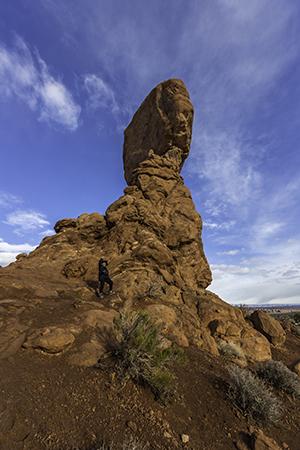
Looking Up At Balanced Rock, Arches National Park/Rebecca Latson.
When I refer to point of view, I mean your point of view. Instead of photographing something straight on at eye level, why not get a little closer ' or even on to ' the ground and aim your camera and lens upward ( granted, for some of us older folks, that might be easier said than done - grin). Or, if you don't want to get close to the ground (especially if it's all muddy from a previous rain shower), how about standing on something like a rock or a tree trunk or hike up the hill a little and then look down over your subject. Not only have you created a different sense of perspective, but you've given your composition a little bit of either closeness or distance, simply by the way you tilt your camera lens.
Practice Makes Perfect
As with all of my other articles dealing with photographic techniques, I urge you to go out and practice. The more you take pictures, the more you learn and the better you become at perfecting a particular method of capturing your own national park imagery. And, most importantly, the more impact you create for the viewers of your national park photos.
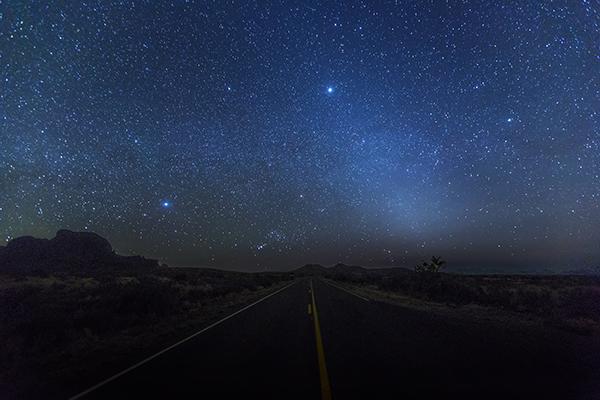
The Road to the Stars, Big Bend National Park/Rebecca Latson.


Comments
Thanks for your good article. Foreground makes such a big difference.
jt