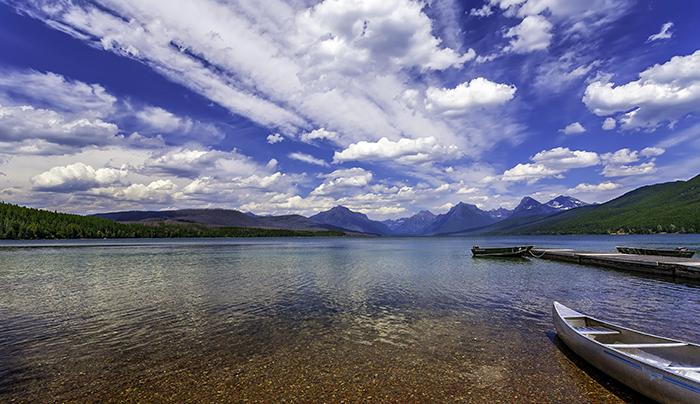
Lake McDonald Vista At Apgar, Glacier National Park/Rebecca Latson
In mid-February of this year, my 89-year old mother fell ill and passed away. To be able to care for Mom as well as handle her estate afterwards, I used up most of my vacation days and thus won’t be taking any long trips to any national parks this 2015. As such, trying to come up with ideas for future photo articles for the Traveler has been a stretch at times. A suggestion was made that perhaps I might write a series of short guides detailing photo ops within the parks I have visited. While I was uncertain as to the originality of my guides compared to other guides out there, I still liked the idea and have thus penned this and the next few future articles.
This guide (as well as the following series) is geared more toward those of us (including myself) who may not have much time to spend in a national park and/or who may not be able to, or have the desire to, hike long distances within said national park’s boundaries. This guide is for those visitors who are totally happy with viewing and photographing the stunning scenery at pullouts and designated overlooks as well as along short, easy, popular trails.
I thought I’d start with Glacier National Park, since it’s near and dear to my heart. I was born in Whitefish, approximately 25 miles away from the park, and I have wonderful memories of riding in my father’s little sports car, top down, with a quilt around me as I sat in the back (yes, his sports car had a small back seat) while Mom and Dad rode up front and we climbed Going-To-The-Sun (GTTS) Road toward Logan Pass with the chill, fresh mountain air whipping around my face and tousling my hair. This Part 1 starts at the western entrance of the park and deals with several of the popular overlooks I’ve visited along GTTS Road from Apgar to the Logan Pass Visitor Center.
Stop #1: South Shore of Lake McDonald at Apgar – It’s an iconic view and you can’t really get a bad shot no matter what time of the day or season. Late fall and winter will yield some especially wonderful snow-capped mountain vistas and perhaps some moody clouds for added drama to the scene. The sun rises behind and to the sides of the mountains at the opposite end of the lake, so you’ll get a silhouette of the mountain range. If the morning is haze-free, set your aperture to f22 and you might be able to achieve a sunstar image as the sun rises higher above the mountains. If there is no breeze, the lake will be mirror-still and you will attain some nice reflection shots. If there are ripples, affix your circular polarizer and you’ll remove most of the glare and moving reflections to see the pebbles beneath the water.
You might also want to use a graduated ND filter so the sky is not blown out (overexposed) above the horizon line and your ground is not too dark (underexposed) below the horizon line. If the day is stormy, try out your ND filter (not a graduated one, but a full ND filter) so you can slow down your camera’s shutter speed and make the choppy water smooth and silky while avoiding blowing out the sky above the mountains. Don’t let any boats moored there keep you from achieving a spectacular shot; use them as foreground objects to anchor your image, as well as reference points and indicators of scale.

Moonset Over Heavens Peak, Glacier National Park/Rebecca Latson

Moonset And Sunrise Over The Valley, Glacier National Park/Rebecca Latson
Stop #2: Heavens Peak (near Packers Roost Trailhead) – The peak is located toward your left, as your vehicle begins the ascent of GTTS Road. If you check a moonrise and moonset schedule for the area, you might luck out like I did and get a neat shot of the moon setting behind the mountain. Just make certain your camera is on a tripod and you are using a grad ND filter so you can adjust your camera’s settings for the darker land below the horizon while not blowing out the sky, the alpen glow, and (if you are lucky), the moon. This stop is also fantastic for a wide-angle view of the mountains, the river and the valley below.
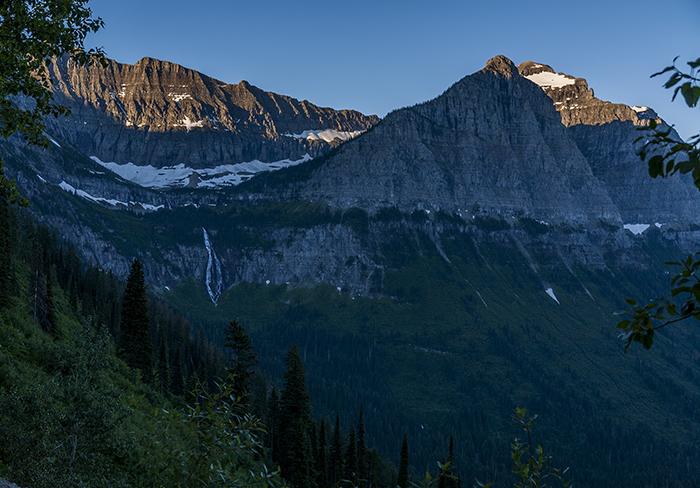
Morning View Of Bird Woman Falls, Glacier National Park/Rebecca Latson
Stop #3: Bird Woman Falls – This is an amazing location but good shots can be a bit tricky to attain as this view area is shaded with lots of trees and an uneven horizon making it difficult to utilize a grad ND filter. You may be spending a little time with your photo editor lightening up the darker areas of this overlook but the resulting image will be well worth it. Another option for getting a great image at this stop is to take two photos, exposing one for the lighter area and the other for the dark area and then blending them together into a single image with your editing software.

The Silky Waters Of The Weeping Wall, Glacier National Park/Rebecca Latson
Stop #4: The Weeping Wall – This stop is one of those places where the amount of “tears” depends upon the amount of snowmelt as well as the season. The Weeping Wall can either be a total sob fest with lots of water spilling onto the road, or a mere sniffle. During those times of healthy waterfall, you can get some lovely rainbows within the veil of water as well as some nice silky water effects when using a circular polarizer or a ND filter to slow down your camera’s shutter speed.
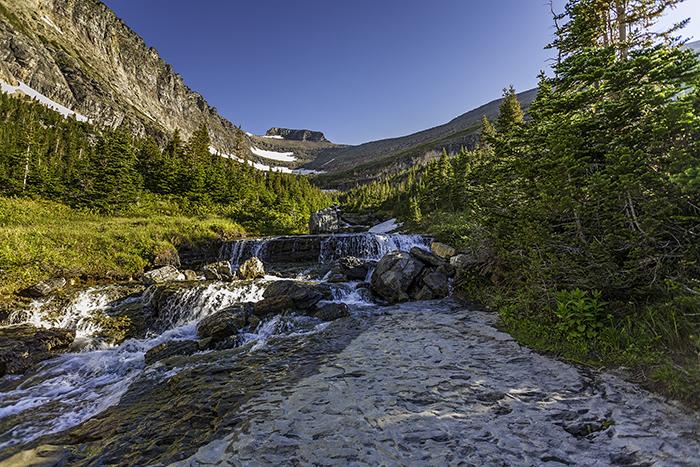
Lunch Creek On A Sunny Day, Glacier National Park/Rebecca Latson
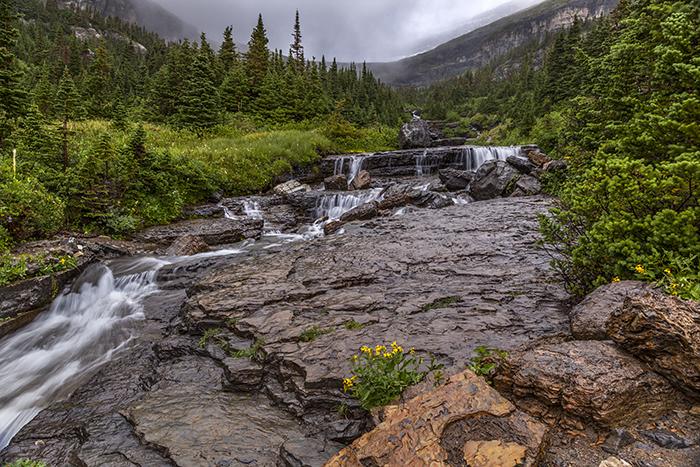
A Cloudy Day At Lunch Creek, Glacier National Park/Rebecca Latson
Stop #5: Lunch Creek – Located at a bend just beyond the Weeping Wall on the way up GTTS Road to the Logan Pass Visitor Center, this creek makes a wonderful foreground anchor to the glacial cirque you see in the distance. On sunny days, use a polarizing filter to increase the color saturation. Use your ND filter so you can slow your camera’s shutter speed and get silky water shots of the creek as the water tumbles over the rocks. On overcast days, the cirque might be hidden within low-hanging clouds, but you can still get some nice moody shots with or without a polarizer filter to bring out cloud texture. Even in inclement weather, don't forget to use that ND filter for silky water to provide a little more interest on what might otherwise be just a plain, gray day.

The View From Hidden Lake Overlook, Glacier National Park/Rebecca Latson
Stop #6: Logan Pass Visitor Center (including the Hidden Lake Trail and the Highline Trail) – This area is definitely the most-visited spot in the park (IMO). It’s easy access both in and out, and the trail to Hidden Lake Overlook and further down to Hidden Lake is probably the most-hiked trail within the park. Thus, if you want to get some photos without multitudes of people, you’ll need to make certain you get there early in the morning before the visitor center is open. Even if you don’t get there early in the morning, you can still get some stellar shots of all the wildlife you might see along the trail (bighorn sheep, mountain goats, hoary marmots, ground squirrels) as well as the stunning view of Bear Hat Mountain and Hidden Lake at the overlook platform.

Glacial Valley View From Highline Trail, Glacier National Park/Rebecca Latson
Highline Trail, across the road from the visitor center parking lot, provides some incredible scenes of wildflowers, wildlife, and the glacially-carved valley below without requiring much of a hike too far along the trail (a good thing if you happen to have issues walking narrow trails with steep drop offs).
One last note: for those of you SLR camera users, if you haven’t already guessed from my repeated mention of these items, make sure you have a tripod as well as a polarizing filter, a grad ND filter, and a full ND filter along with all of your other camera gear. Those filters should be must-haves in every photographer’s camera bag. Regarding lenses, I usually take my 16-35mm lens, 24-70mm lens and either my 70-200mm lens or my 100-400mm lens. If I want to focus extensively on wildlife, I might also rent a 500mm or 600mm lens to finish out the gear, but that’s only if I feel like hefting around a heavy prime lens. If you are short on packing space, bring just two lenses: a wide-angle lens (anywhere from 11mm to 35mm) and a long (telephoto) lens (anywhere from 200mm to 400mm). Zoom lenses offer plenty of leeway regarding focal lengths.
Here ends Part 1 of my armchair Glacier National Park photo guide. I’ll continue with Part 2 next month, leading you from Siyeh Bend to the eastern entrance of the park. I hope what you read here will help you with your own Glacier National Park photography.
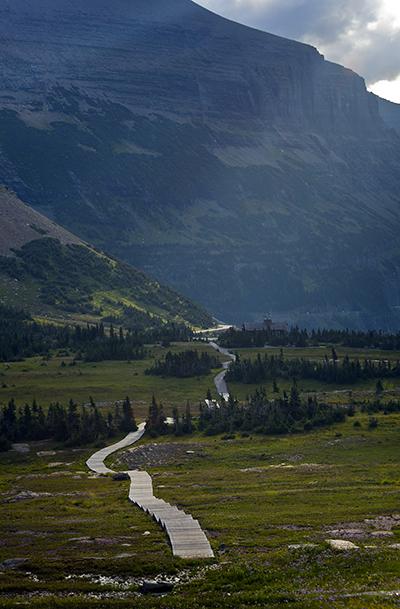
Morning Light On Logan Pass, Glacier National Park/Rebecca Latson



 Support Essential Coverage of Essential Places


Comments
Rebecca, I so appreciate your photos and, not only that, but you share the "where & hows" of them. Some photographers have their "secrecy" about where they took their shots to "keep down the competition," but you tell it right out. IF I ever get out to Glacier some day, I will try to keep your info in mind. I am only able to "travel by armchair" these days. I have gotten "older" (only 65 at this time) and can't do a lot of physical things I used to be able to do, but ... that's not my real hold up. It's lack of funds. I can't hardly afford to get the next town over for now, but fortunately I live in a cabin on a wooded hillside in Tennessee. It'll have to do for now. Something else I do appreciate about your pictures is that it's an encouragement to me just to know that these places still exist (e.g. Glacier NP). Thanks for sharing. randy
Randy, you are welcome! Thank you so much for the kind words.
What is an ND filter?
Hi There. A ND filter is a Neutral Density filter. It is a gray piece of glass or resin which you can purchase in varying intensities of darkness that screws onto your lens (the filters come in lens-specific sizes like 58mm or 77mm or 82mm, etc.). It doesn't change any of the colors of your composition - it simply allows less light to hit your camera's sensor. You screw this filter on to the end of your lens, and then you set a slow shutter speed on your camera. The slow shutter speed allows the camera shutter to stay open longer to let in more light while at the same time slowing down movement, like running water, for instance. ND filters allow you to get silky water shots (or blurred movement) without blowing out all of your highlights (bright areas, like sky or clouds or the white froth in a waterfall).
Bear in mind, a Neutral Density filter (ND filter) is not the same thing as a grad ND filter (graduated neutral density filter). So don't get the two confused. A grad ND filter is a piece of glass or resin that is gray through half of the filter and then clear through the other half. That gray shade can be the same shade throughout (called a hard edge), or it can be darker at the top of the filter and then get gradually lighter near the center portion of the filter until it's clear (called a soft edge). Grad ND filters are great for compositions where you have a definite horizon, with differing exposures (like a light or bright sky at the top of your horizon and a mountain range or forest or darker ground at the bottom of your horizon). It evens out the exposure (i.e. compensates for the differences in light and dark) without changing the colors of your composition, and it keeps your darker areas from being under-exposed and your lighter areas from being over-exposed.
This is a simplistic explanation, at best, but I hope this helps. If you google "ND filter" or "grad ND filter", you'll get far better, more detailed explanations.
What do you recommend for the current smoky conditions?