
Dawn's rosy glow, Lake Louise, Banff National Park / Rebecca Latson
For this month’s article, I’m presenting you with a “twofer” for your national park photography: cropping and the decision of whether or not to compose your image horizontally or vertically. However divergent the topics may seem, these methods of composition are related in the way that all photographic techniques are related: they are a method of placing more focus on your subject or an aspect thereof.
To Crop or Not to Crop
During a photo tour I took a number of years ago, the instructor discussed cropping with practically every other sentence, as he imparted compositional guidance to us photographers. It was as if every single photo he took for himself, he would ultimately crop at some point. I mentally began to refer to him as “The Crop King” because I (at that time in my photographic career) never cropped any of my own images except to eliminate an odd twig or a stop sign or some other peripheral feature detracting from the scene.
Fast forward to the present day. While I still do not apply much cropping to my images, I will, on occasion, crop to select only a portion of the entire image in order to make a point or refine the focus on my subject. I know, why not just compose the image so I don’t have to crop anything in the first place, right? What does it mean to crop an image?
To crop an image is to digitally “slice off” parts of the original composition in order to magnify your photo’s subject or some feature of the subject. Focus and subject are the two keys. Are you happy with the original image, or would you like to place a little more emphasis on some particular item within your image?
Below are several examples taken during my April 2016 visit to Banff and Jasper National Parks, Canada. You see the original work along with the cropped version. I admit up front that I didn't crop much from the photos because my purpose for cropping was to reduce the amount of too much sky or other extra space in these images.

Icefield Parkway scenery, original image, Jasper National Park / Rebecca Latson

Icefield Parkway scenery, cropped image, Jasper National Park / Rebecca Latson

On the Glacier Skywalk, original image, Jasper National Park / Rebecca Latson

On the Glacier Skywalk, cropped image, Jasper National Park / Rebecca Latson

Morning alpenglow over a frozen Lake Louise, original image, Banff National Park / Rebecca Latson

Morning alpenglow over a frozen Lake Louise, cropped image, Banff National Park / Rebecca Latson
Try experimenting with your photo editor’s crop tool on some of your own photographs. Usually, the crop icon looks something like a squished or slanted box. Save your cropped image under a different name so you can compare the before and after. The crop tool I use in Adobe PhotoshopTM allows me to select crop templates of a certain size, such as 4x6, 5x7, 8x10, square or I may even choose to freeform my crop, wherein I can cut to whatever dimension I wish without any standard photo size constraints.
A word of warning: it is possible to crop off too much and your result may look unfocused or even pixelated (i.e. you can see the square pixels that make up the totality of your image). This is due to your camera’s sensor, which in turn, impacts resolution. There are a number of online articles out on the web that have good articles explaining camera sensor sizes, including crop factors and pixel count. The gist is, if you crop a photo, you definitely want to have good clarity to the resulting image that remains after all the slicing and dicing.
Horizontal Vs. Vertical
Let’s now go on to talk about horizontal (landscape) versus vertical (portrait) image layouts. Yes, I know, the vast landscapes of the national park vistas were MADE for horizontal shots. Right? Take a look at the images below. Do the vertical shots work well to your eye, versus the horizontals? Remember, as with my previous article about using a flash in a national park, it's all subjective. Some like it, others don't.

Sunrise over Mount Temple and Lake Louise, Banff National Park / Rebecca Latson

Sunrise over Mount Temple and Lake Louise, Banff National Park / Rebecca Latson

Snow and ice-clad creek, Banff National Park / Rebecca Latson

Snow and ice-clad creek, Banff National Park / Rebecca Latson

Glacial snow and ice, Jasper National Park / Rebecca Latson

Glacial snow and ice, Jasper National Park / Rebecca Latson
Now, let’s talk about capturing a vertical layout, in general. If you have turned your camera so that you are going to take a vertical photo, then it may either be that the scene lends itself well to vertical lines or you are looking for a good magazine cover shot (grin). Tall trees are great for vertical shots because you can include the entire length of the tree and thus get a sense of scale for the scene. Glaciers in a valley are good subjects because a vertical layout allows the valley walls to not only act as a frame for the glacier, but also zoom the viewer’s focus directly to the glacier because it’s the main subject of the composition, rather than just a part of the overall landscape. Like cropping, a vertical shot reduces extraneous visuals. In addition to trees and valley walls, waterfalls (like the one I photographed below, while visiting Mount Rainier National Park) are also great themes for vertical layouts because you can capture the fall of the water from beginning to end and emphasize the waterfall’s length. Historic architecture works well for verticals because of stone columns or upright wood beams or any other building feature exhibiting vertical lines.
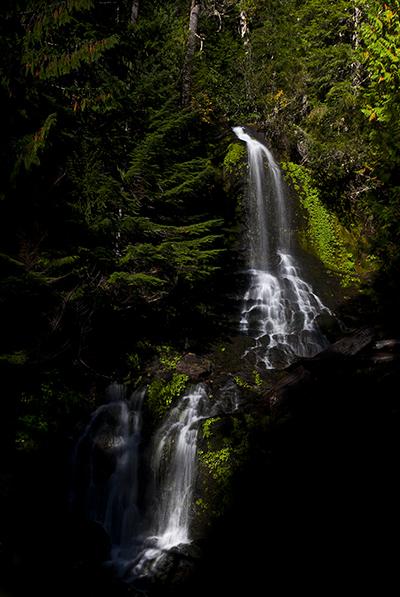
Falls Creek Falls, Mt. Rainier National Park / Rebecca Latson
When thinking about vertical lines, think about leading lines, too. A stream in front of you leading off into a forest or toward a mountain, or a fence or a rocky ridge in front of you leading the viewer’s eye from the foreground way into the distance, make for a nice vertical shot.

Early evening over Lake Louise, Banff National Park / Rebecca Latson
I know, oftentimes, it's difficult to achieve a level composition while handholding your camera in a vertical position. It's even difficult to keep the camera level in a vertical position on a tripod, if you have your camera attached to the tripod's plate. That's a big reason I never captured many vertical shots, at least not until I discovered the "L-bracket" (aka "L-plate"). It is a metal, L-shaped bracket that screws onto the bottom of your camera, where you would normally attach a separate, flat camera plate. These brackets make it extremely easy to affix your camera horizontally and vertically onto a tripod. Some L-brackets are even designed for specific camera models. Note: if using an L-bracket, ensure that your tripod head accommodates the bracket. The online site The Digital Picture has a great article explaining what an L-bracket is, how it is used, and a review of several brands.

This is what an L-bracket looks like / Rebecca Latson

The ease of placing a camera vertically on a tripod with an L-Bracket / Rebecca Latson
The whole idea of these articles I write is for you to take a few of these suggestions with you into the national parks. I know your goal is to capture as many photos as possible of the stunning scenes, historical/architectural wonders and amazing wildlife before you. You want these images to be a reminder to you, your friends, family (and maybe even contest judges) of the natural beauty in a national park. Experimenting with your photos should be a part of this goal. Think about cropping as well as horizontal vs. vertical layouts. Try it even if you don't think you will like it. My motto is: Nothing Ventured, Nothing Gained. You might surprise yourself. The more you experiment, the more you learn and the more your photos will evolve to reflect the glorious windows into nature and history that a national park provides.

Early evening at Lake Louise, Banff National Park / Rebecca Latson


Comments
I'm not sure why cropping would even be consided a 'wrong' thing to do. Lots of good reasons to crop - maybe you've only got a 300mm lens and the distance to the bird/animal calls for a 500mm lens. Or changing the lens on your camera is either not practical (blowing dust) or you'd lose the shot. As long as the quality of the cropped shot stands up, then...
Great information and useful. I learned a lot.
Good article, thank you. I fairly often try vertical shots, but frequently don't like them. Maybe it's composition I need to
take more time with. Will keep trying.