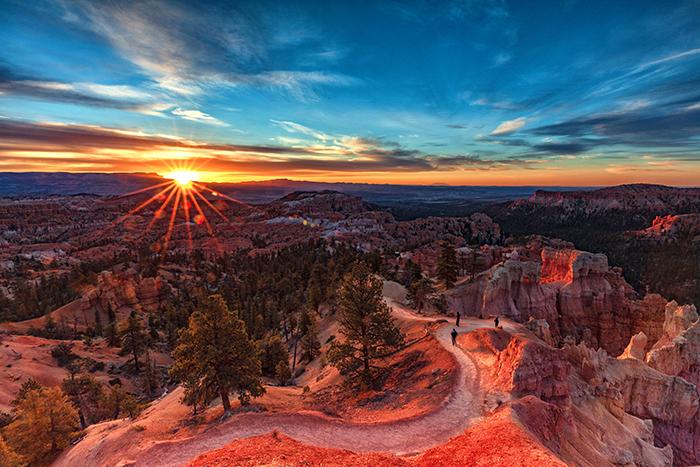
Watching a sunrise and capturing a sunburst at Sunrise Point, Bryce Canyon National Park / Rebecca Latson
I’ve mentioned this before, and because of the nature of this month’s article, I’ll mention it again: Photography is a subjective art; one person’s cover shot is another person’s deposit into the virtual trash bin.
How many of you have looked at images of the sun where that golden-yellow or golden-orange orb zings out with the shape and brilliance of a star? That’s called a sunburst (aka starburst). Some people think this photographic treatment is pretty cool, while others give it a thumbs-down. Whether you like the result of this technique or not, creating a sunburst with your camera is great for learning more about your camera’s manual settings. I’m talking about SLR cameras here, but for those point-and-shoot cameras that have a manual setting choice, this should work with them as well, as long as your point-and-shoot allows for very small apertures. I say “should” because all of the national park images you see here were captured with my SLR and not with a point-and-shoot.
I subscribe to PetaPixel.com, an online magazine of “Photography and Camera News, Reviews and Inspiration.” Recently, they published an article explaining the physics of photographic sunbursts. Although a bit technical, it was still an interesting read. In a nutshell, a sunburst is created when you use small lens apertures (large f-stop numbers of anywhere between f16 to f22). This means that the hole through which light travels from lens to camera sensor is quite small and causes the light coming through that narrow opening to bend (diffract) off of the lens shutter blades and create star rays. The more shutter blades you have, the more star rays you’ll get. Differently-shaped shutter blades create slightly different sunbursts.
Sunbursts are best achieved with a clear sky around the sun. There can be clouds in the sky, but you want to make certain the sun is seen in all of its glorious brilliant clarity as a "single point source." It just happens that the sun is clearest and the most filtered when it is either touching the horizon line during sunrise or sunset, and/or when it is peeking through leaves, branches, or trees. The smaller the point source, the sharper the sunburst. The higher the sun climbs into the sky, the less filtered it becomes and the more diffused (fuzzy) your sunburst appears.
As you can see from this series of sunrise images, below, which I photographed from my spot along the Rim Trail of Bryce Canyon National Park, between Sunset Point and Sunrise Point, my sunburst became brighter and larger as the sun climbed higher into the sky and the rays of my sunburst lengthened and started to diffuse a little bit. I used a lens hood for this series of shots, but as the sun rose, so did the number of flare spots and lines, even with the lens hood affixed. A little flare is OK, IMO, but a lot of flare can be a distraction. You can remove flare spots relatively easily with your photo editing software, but the larger the flare spots and flare lines, the greater the risk you'll remove larger portions of landscape detail, as well.

Sunrise sunburst over Bryce Amphitheater #1, Bryce Canyon National Park / Rebecca Latson

Sunrise sunburst over Bryce Amphitheater #2, Bryce Canyon National Park / Rebecca Latson

Sunrise sunburst over Bryce Amphitheater #3, Bryce Canyon National Park / Rebecca Latson

Sunrise sunburst over Bryce Amphitheater #4, Bryce Canyon National Park / Rebecca Latson
While the sun climbs higher into the sky, brightening the sky while becoming brighter itself, your area below the horizon will still remain darker and shadowed. Utilizing a graduated neutral density filter (grad ND) can mitigate the overexposure of light areas (highlights) while you set your camera's exposure to capture detail in the darker areas of your composition. Grad NDs are made of glass or high-quality resin and are half clear/half gray shaded. These filters come in all sorts of shapes (round, square, rectangular) with varying shades of gray (densities). The non-round filters have special holders that attach to your camera's lens. I use a 4x6 rectangular grad ND, which I simply hold up to my lens. The problem with using a non-round grad ND is that a lens hood won't fit over it. As such, I am guaranteed the appearance of a certain number of flare spots and lines. Is a lens hood better than a grad ND? It's a trade-off. As the sun climbs higher into the sky, I don't have any filter to mitigate the exposure difference between the bright sky and darker ground when using a lens hood and I risk blowing out the highlights sooner rather than later. If I opt for my grad ND instead of the lens hood, then I'll get flare spots and lines, the size, number, and length depending upon whether or not I continue capturing images as the sun rises higher and higher.
Articles I’ve read regarding creating sunbursts advise the use of a tripod for this technique. I’ve used a tripod and have also just handheld the camera. During those instances when I handheld my camera for a sunburst shot, I applied the tried and true "burst method" of holding my finger down on that shutter button for a succession of shutter clicks. I usually capture at least one clear, sharp, keeper amongst the multiple shots. Of course, the burst method uses up memory card space, so keep that in mind and carry plenty of spare cards.
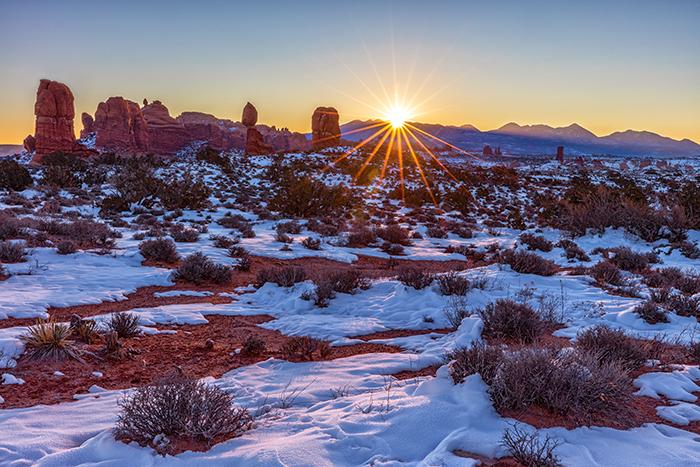
Arches National Park was a fantastic place for sunbursts, particularly during sunrise above the La Sal Mountains and over such iconic formations as Balanced Rock. Trees providing a natural frame around Landscape Arch also offered a shady escape from the mid-morning sun's glare and, by happy accident, the green needle-thick branches created a nice single point source for a sunburst shot.

Sunrise and a sunburst over Arches National Park / Rebecca Latson

Sunrise and a sunburst over Balanced Rock, Arches National Park / Rebecca Latson

A sunburst between the branches at Landscape Arch, Arches National Park / Rebecca Latson
This image of Checkerboard Mesa in Zion National Park was captured using a wireless shutter release because I wanted myself in the composition for scale and reference. It’s a large, broad, ancient lithified sand dune with horizontal cross-bedding and vertical weathered joints that give that iconic formation a “checkerboard” or "graph paper" pattern. While setting up the shot, I noticed the point source of sunlight through the branches and deliberately adjusted the camera settings to create a sunburst for this image.

A sunburst shining over the photographer and Checkerboard Mesa, Zion National Park / Rebecca Latson
I captured this shot of the ocotillo plant and its shadow under a midday sunburst while looking around the broad, spaghetti-western landscape in Big Bend National Park, trying to find an image that reflected the winter starkness. I crouched low for this near-ground perspective.

A stark winter sunburst over the landscape, Big Bend National Park / Rebecca Latson
I’d just arrived in Bryce Canyon National Park and was feasting my eyes upon the deeply-saturated late-afternoon glow of the landscape at Sunset Point. To avoid getting in the way of other visitors with my tripod setup, I edged near a stand of trees where I noticed the pinpoint of sun through the branches. I wanted to get both sunburst as well as the colors of the rock formations from the sun’s warm glow.

Late afternoon colors and a sunburst at Sunset Point, Bryce Canyon National Park / Rebecca Latson
By the way, what works for the sun, works for the moon and lamp lights and candlelight, as well – anything acting as a single-point light source. You should note, though, that a "moonburst" will tend to be a bit more diffused than a sunburst, as seen from the images below.

A New Year's full moonburst over Balanced Rock, Arches National Park / Rebecca Latson

A full moon over the Three Gossips, Arches National Park / Rebecca Latson
Whether you love the results of this technique, can’t stand it, or are on the fence post, you still must admit it’s an interesting way to portray the sun, as well as being a great method for experimenting with your camera’s manual settings while learning more about photography in the process.

A midmorning sunburst at Fishercap Lake, Glacier National Park / Rebecca Latson


 Support Essential Coverage of Essential Places


Comments
Great photos, Becky. While I have not tried to get starburst in my photos, I do try to minimize lens flare. I have an adjustable Lee lens hood for wide angle lenses that takes 4x6 filters, which helps with the flare problem. However, at really wide angles one will see the edges of the lens hood, limiting the useful range of the wide angle lens. The filters fit into the back portion of the hood assembly near the lens, allowing the flexible hood to be extended and bent to shade the lens. When not using a lens hood or when the hood is insufficient, I will manually shade the lens with a hand or hat, watching the view finder or screen to be sure not to get my hand or hat in the image.
Your images in this article make me think that a time lapse with those compositions would be interesting.