Sunrise at La Sal Mountains Viewpoint, Arches National Park / Rebecca Latson
Let me preface this guide by stating you won’t see any photos of Delicate Arch. Why? After all, Delicate Arch is a huge photographic draw for Arches National Park; it’s even on Utah’s license plate!
You see, as with the previous Glacier National Park armchair guide, I’ve geared this guide to Arches National Park for those who cannot or do not wish to hike longer / steeper distances and are happy to capture stunning images from view areas, parking lots, pullouts, and really short jaunts along the popular trails. While the hike to Upper Delicate Arch Viewpoint is super-short, it’s a bit steep near the last. And, while the hike to Delicate Arch, itself, is a short 1.5-mile trail, it’s mainly over slickrock, with a steady gain in elevation and a rather narrow ledge near the end just prior to encountering an almost-waist-high (for me, anyway) rock ledge with a flat shelf over which one must haul themselves and their camera gear in order to get to the arch, proper.

Mule Deer at Arches National Park / Rebecca Latson
Really, you can stop anywhere alongside the road and capture wonderful compositions. There are all sorts of photographic opportunities within the park, at pretty much any time of day. It’s not all about the arches, you know. This amazing national park nicely shows off its geology, mountainscapes and wildlife (ex. mule deer and pronghorn) from the convenience of your car window, even.

Fault line displacement, Arches National Park / Rebecca Latson
Stop 1: Moab Fault – After spending some time in the Visitor Center at the park entrance, your vehicle will begin a short, steep climb around a bit of a hairpin curve and over a part of the Moab Fault. There’s an overlook with a pictorial explanation and it’s a great place to try and get a wide-angle shot of the fault (well, the up-thrown side, at least, as you are standing on the down-dropped side). I feel, however, that even with a photo of such a large area, it’s still a little difficult to actually visualize the fault. Instead, try this: get a closer photo of just the part of the fault where you can clearly discern displacement within the rock. The image above is of a roadcut which clearly depicts fault displacement. The photo was taken while standing in the Visitor Center parking lot early in the morning, pointing my camera across Hwy 191 toward the rock outcrop. I lucked out and captured this jogger passing by, which added a sense of scale to the scene. Early morning is a propitious time to photograph this particular outcrop because the rock colors really pop and traffic is minimal to non-existent. Of course, morning puts this part of the fault in the shade, so a higher ISO and wider aperture or slower shutter speed (or both) is recommended, as is the use of a tripod. During the parts of the day where the sunlight brightly reflects off of this outcrop, you might want to use a polarizer to cut through the glare. Traffic will also be heavier on the road later in the day, so keep that in mind as well.

Looking back toward Moab from the Moab Fault Overlook, Arches National Park / Rebecca Latson
Stop 2:The View From The Moab Fault Overlook – Stay a bit longer at this overlook, if you happen to be in the park during early morning, and turn your camera toward the town of Moab to capture the beautiful colors of the red rock and sky as the sun begins its ascent. Remember that the lower part of the horizon will be darker than the sky and adjust your ISO and/or aperture and shutter speed accordingly. You might even wish to utilize a graduated neutral density (grad ND) filter to even out the exposure differences. Or, take two shots: one exposed for the sky and one exposed for the ground and blend the two together with your photo editing software.

Early morning at Park Avenue, Arches National Park / Rebecca Latson

A twisted view of Nefertiti, Arches National Park / Rebecca Latson

Steps up the trail at Park Avenue, Arches National Park / Rebecca Latson

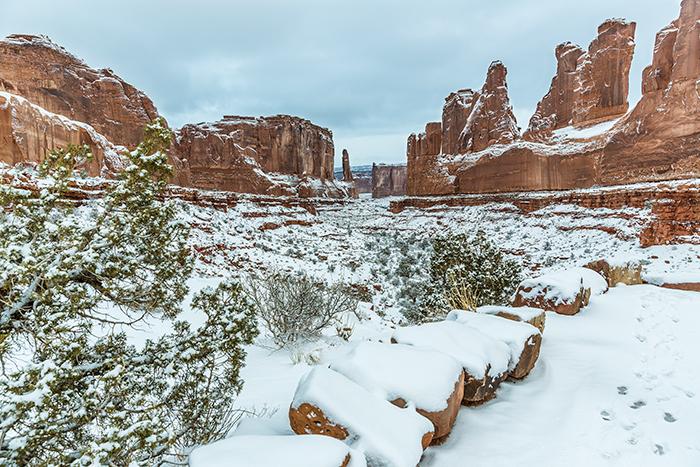
Snow day at Park Avenue, Arches National Park / Rebecca Latson
Stop 3: Park Avenue – This is the first, official (by “official”, I mean paved) view area and trailhead. You’ll see it on your left as you navigate the main road through the park. Park Avenue really does remind one of sky scrapers on either side of a wide avenue. If you visit during the morning, most of this view will be shaded with the exception of the formations in the far background as the rising sun shines on that area first and the shaded walls and tall formations on either side act as a “frame” for the sun-gilded red rock in the distance. As the day progresses, the sun will glide over this area, highlighting first one side, then the entire view area, and then the other side. You might want to visit Park Avenue more than once to determine for yourself which type of lighting you like best. As with most other stops within Arches National Park (or any national park, for that matter), the season, time of day, and weather can put a different spin on the view.

An icy morning at the La Sal Mountains Viewpoint, Arches National Park / Rebecca Latson

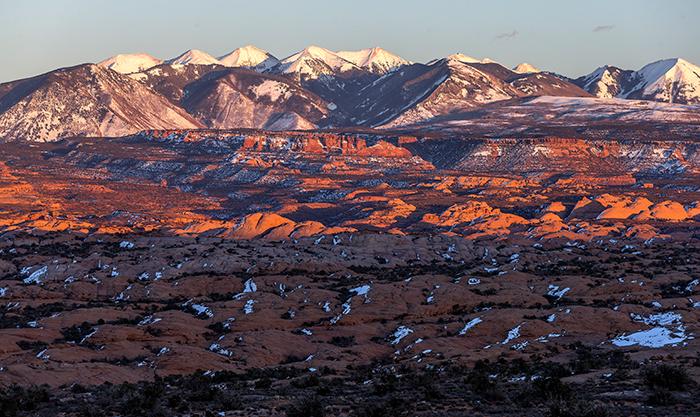
Sunrise at La Sal Mountains Viewpoint, Arches National Park / Rebecca Latson

Afternoon at La Sal Mountains Viewpoint, Arches National Park / Rebecca Latson

The Vast Beyond at La Sal Mountains Viewpoint, Arches National Park / Rebecca Latson

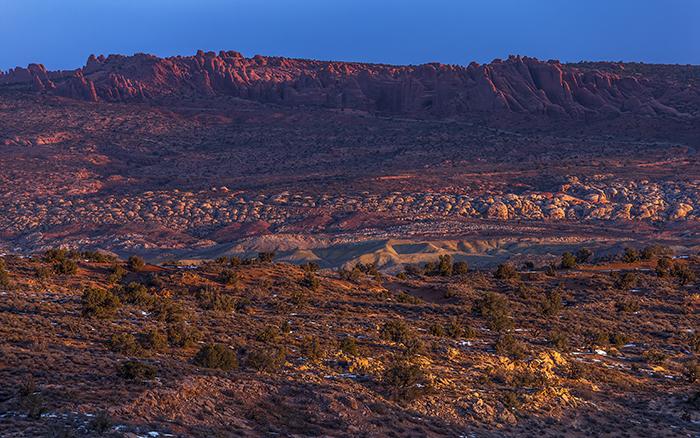
A morning vista at La Sal Mountains Viewpoint, Arches National Park / Rebecca Latson

A telephoto evening at La Sal Mountains Viewpoint, Arches National Park / Rebecca Latson
Stop 4: La Sal Mountains Viewpoint – Hands down, this is my very favorite place to photograph within the park, and there are no arches! The turnoff to this viewpoint will be on your right, just past the Park Avenue stop. At the La Sal Mountains Viewpoint, you and your camera and tripod can enjoy a 360-degree view of the landscape. Sunrises are fabulous at this viewpoint, but you can capture some amazing images in this spot no matter what time of day or season.
Have on hand a circular polarizer and grad ND filter to bring out the colors of the sun and sky, the textures of any clouds, and to prevent blowing out the horizon above the La Sal Mountains if you are exposing for the foreground. Use your wide-angle lens (anywhere from 11mm to 17mm) to capture a broad swath of the scene before you. While you’re at it, try getting low to the ground to photograph an interesting perspective of the scene created by the exaggeration of depth and size imparted by your wide-angle lens. Choose an interesting foreground object like a bush or a large rock to create a sense of depth as your gaze hops from foreground to mid-ground to the mountains in the background.
Alternatively, take out your zoom telephoto to capture a close-up landscape image of the La Sal Mountains during the evening, when the setting sun bathes the mountains and red rock in warm golden tones. Yes, I did say use a telephoto lens for a landscape.

The road over Courthouse Wash, Arches National Park / Rebecca Latson
Stop 5:Courthouse Wash – Driving further north from the La Sal Mountains Viewpoint, past The Organ, Three Gossips, Courthouse Towers Viewpoint and Sheep Rock, you’ll cross over a bridge with cottonwood trees below. There are pullouts on either side of the road just beyond the bridge. The line of trees makes an interesting foreground layer with the red rock formations in the background. Include the road for an interesting leading line composition.

Sunrise at Balanced Rock, Arches National Park / Rebecca Latson

The view at the end of the Balanced Rock trail, Arches National Park / Rebecca Latson

Becky at Balanced Rock, Arches National Park / Rebecca Latson
Stop 6: Balanced Rock – Depending upon the time of day at which you stop, this particular spot can get pretty crowded and it might be difficult to find a parking place. Mornings or late evenings are great times for the photographer to visit this rock formation, which someday (or some century), will topple over.
There’s a short path leading a little beyond Balanced Rock, with an additional narrow dirt trail leading up to and around the formation, itself. At the end of the path, point your camera away from Balanced Rock and into the distance while using your wide-angle lens to get that different perspective about which I mentioned earlier. Turn your camera and tripod back toward Balanced Rock and with your wide-angle lens, get low to the ground and really close to Balanced Rock, itself. Using your camera’s timer, a wireless shutter release, your friend or family or a complete stranger, you can also get some cool selfies that impart a sense of scale to the scene.
If you arrive at Balanced Rock prior to sunrise, park your car on the side of the dirt road across the main road from the parking lot. Take yourself, your tripod and camera up onto one of the slickrock outcrops to capture sunrise shots as the golden orb peeks above the rock formation to the left of Balanced Rock. Set your aperture anywhere from f11 to f22 to try and capture a sunstar. You’ll probably need to use a grad ND filter, and be aware that your foreground will still be rather dark since you will want to expose for the sky. This of course, means you will need to do a little post-processing afterwards to lighten the foreground. You may even need to use some noise-reduction software since the foreground might look a little grainy, depending upon your ISO setting (the higher the ISO, the more chance of grain aka “noise”). A low ISO and a very slow shutter speed (to prevent underexposure) should impart less graininess.

Sunrise over the valley as seen from Willow Bend Road, Arches National Park / Rebecca Latson
Stop 7: Willow Bend Road- This is the primitive dirt road about which I mentioned in the previous paragraph. It’s directly opposite from the Balanced Rock parking lot. Park your car and walk over to the slickrock outcrops to get views not only of Balanced Rock, but – if you turn your camera and tripod in the opposite direction – the valley beyond (gorgeously saturated with gold and purple and pink in the early morning, immediately after the sun has risen).
Depending upon what kind of vehicle you are driving (and what your rental contract states), you may want to only drive a short distance along this road, past the restrooms on your left and the picnic area on your right. Park somewhere after that and look beyond the dirt road to the land and formations ahead of you. Try this area both in the morning and the evening to see the changes in light and shadow.
I’ll stop here, at Willow Bend Road and continue on with Part 2, next month. There are a number of small, dirt pullouts that I have not mentioned but at which you can stop and photograph the amazing landscape encompassed by Arches National Park. By now, you should be getting the idea that – as I wrote earlier in this article – this park is about much more than just the arches.

Morning on Willow Bend Road, Arches National Park / Rebecca Latson


 Support Essential Coverage of Essential Places


Comments
thank you for this! Delicate Arch proved too much for me so I am especially enjoying your pictures and photo advice. Next visit will be even more exciting!
So much better than the ones that show wonderful photo sites and then mention in passing that you have to rapell down a cliff or crawl through a cave to get there! Not all of us can outclimb a mountain goat! Please keep these coming.
What nice work.
My last three attempts to get to Arches have met with defeat and forced cancellations. I sure hope it works better next spring. In the meantime, many thanks for some tantalizing glimpses of what I've been missing.
Thanks for the nice words, everybody! I'm so glad that these guides may prove helpful to you. Amarillobymorning, you made me laugh with your comment.
Great pictures. Arches is one of our stops on the Southwest Field Trip. Nice to see it with snow dusting. Amazingly good coverage an yert no pictures of arches.