
Sunset over the Virgin River and the Watchman, Zion National Park / Rebecca Latson
In many of my articles for the Traveler, I assure you no matter what camera you use, you can capture wonderful images. And you can. The photos you see in those articles, though, are usually the results of my own camera of choice, an SLR. After conducting a little point-and-shoot research to help an acquaintance with a purchase decision, I realized I really should “walk the walk” in addition to “talking the talk” regarding non-SLR photo inclusions in my articles. So, during my recent February trip to Zion National Park, I packed along a couple of new point-and-shoot cameras in addition to my SLR and iPhone 8 to prove you can, indeed, capture great shots using any camera and applying tips and techniques I’ve provided in previous articles.
This is not a camera review, so I am not going to name the camera brands I took with me. The megapixels ranged between 12-20 mp with prices from $300 to over $800 (including the iPhone 8 price). I wanted point-and-shoot cameras that captured both jpeg and raw files because it would open more possibilities for me to test both file formats. I shoot raw files, but I know the average visitor to a national park may not want to deal with much photo editing and is perfectly happy to use whatever photo comes straight from the camera. That said, you should be aware that achieving a unique photo (rather than just a “grab shot”) to arrest your viewers’ interest and make a worthy edition to your national park photo album will still probably require a minimum amount of editing, as the Canyon Overlook example below, demonstrates.

The morning view at Canyon Overlook - unedited, Zion National Park / Rebecca Latson

The morning view at Canyon Overlook - edited, Zion National Park / Rebecca Latson
You see, I am one of those photographers who believes every image benefits from some bit of editing. The camera does not always capture the image the way you saw it with your own eyes. For instance, human eyes are better at seeing into the shadows. I could see the entire Canyon Overlook landscape, including the canyon floor, through the shadows, but you wouldn't be able to tell that from the original shot, above. That doesn’t mean the camera did not capture all the data – it just means you need to tease that data out of the shot for a meaningful rendering of the scene you viewed. Edits may include cropping, darkening (all or part of a scene), lightening (an entire scene, or just the shadows), brightening, adding a little more saturation to the color, and, of course, adding a bit of sharpening. If you want to get fancy, you might also want to add some judicious vignetting to the image to place more focus on your subject(s).
These point-and-shoots I packed with me were newer models; I wanted up-to-date technology. Of course, I encountered a learning curve that needed to be overcome before feeling even a little comfortable with the controls and settings. Naturally, the more point-and-shoot technology improves, the more detailed the camera settings and thus more complicated the learning curve. I admit, I occasionally found myself standing at a scene, hunting for the right setting. Ultimately, I just turned the mode to Auto and let the camera make the choice for me.
I figured many, if not most, of you are generally using Auto mode with your point-and-shoot anyway, right? While I appreciated the ease of allowing the camera to choose the exposure for me, there were still some exposure issues with which to deal when it came to scenes of large contrasts (e.g. a dark foreground and a bright sky). Sometimes, the foreground would turn out way too light, and sometimes, it would be a little on the dark side, depending upon what the camera’s sensor made of the scene. Aside from that issue, Auto mode worked well enough and I wanted to keep everything simple. My iPhone 8's "auto mode" is called "HDR," and I was impressed at how well it distinguished light from dark. Smartphone cameras sure have come a long way since their inception some 10 years ago.
Ok, let’s talk about getting cool shots with your non-SLR cameras.
The Leading Line Technique. For the two shots below (hikers on the tight switchbacks known as Walter's Wiggles and the bridge over the Virgin River), I used the leading line technique to guide the viewer's eye from the image foreground and lead it in a line toward the image background. Squiggly, straight, or diagonal, it's still a leading line. Trails and bridges make awesome leading lines, as do rivers, streams, fences, or a stand of trees.

Looking down Walter's Wiggles on the Angels Landing trail, Zion National Park / Rebecca Latson

The bridge leading over the river and on to the day's adventures, Zion National Park / Rebecca Latson
High-Contrast Scenes. This is not a technique, but an example of how difficult a high-contrast scene (during a snowstorm) can be to capture with a non-SLR. Had I used an SLR, I would have exposed for the darker rockface and used a grad ND filter to keep the sky from "blowing out" (overexposing). With the point-and-shoot, I focused on the bright sky instead of the canyon formation and the camera compensated by darkening the entire composition in order to keep the sky from overexposure. I simply lightened the exposure of the rock formation when I edited the photo.

Canyon scenery on a snowy day along the Lower Emerald Pool trail, Zion National Park / Rebecca Latson
Close-Ups. As mentioned in last month's article, I made sure to capture some of the smaller things I noticed amongst the immensity at Zion. Point-and-shoot cameras have a macro setting, allowing you to place the camera quite close to your subject. Had I chosen to do so, I could have utilized the camera's telephoto setting instead of the macro, or I could have come in close with my smartphone.

Juniper tree close up, Zion National Park / Rebecca Latson
The Rule-Of-Thirds. Rather than place the bonsai-shaped Ponderosa pine tree smack dab in the center of the composition, I created a diagonal view, with the tree on the left side of the composition. Unusual placement of a subject creates interest.
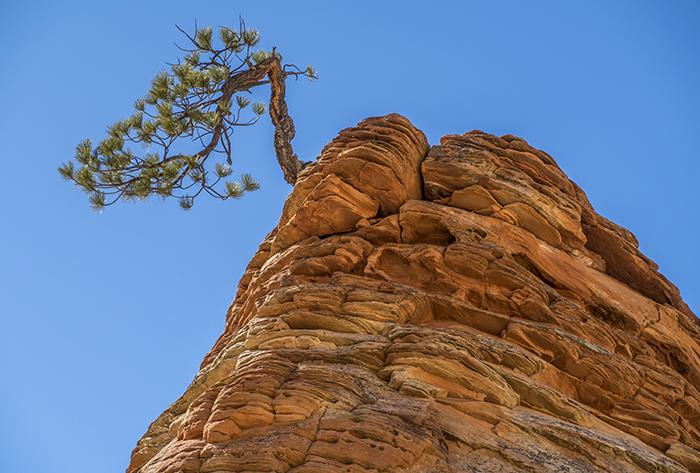
Withstanding time and the elements, Zion National Park / Rebecca Latson
Natural Frames. Trees make great natural frames, as do arches, cave and tunnel openings, and other rock formations. Natural frames, like vignetting, draw the viewer's eye toward the main subject.

Natural frames in Zion National Park / Rebecca Latson
Ground-Level Shots. While I didn't exactly lay on the ground to get this ground view of lithified cross-beds, the idea is essentially the same. I know you've seen photos taken on a highway, at ground level, with scenery in the distance, or an almost-ground-level view captured in the middle of a stream or creek. Ground-level images create a different perspective, as opposed to standing up, or looking down from above, to get a shot of the same scene. For the shot here, I stood in a ditch between the road and the sandstone formation, aimed my smartphone toward the cross-beds and bent down low for a near-ground-level view.

Layers of sandstone cross bedding, Zion National Park / Rebecca Latson
Wildlife. You may notice that I have not included any wildlife stills in this article. To be honest, I didn’t see much wildlife during my winter stay in Zion except for wild turkeys, other smaller birds, and mule deer. What wildlife shots I got were captured with my SLR because it was already hanging around my neck with the 100-400mm telephoto lens attached, readily accessible for fleeting wildlife. I did, however, get some iPhone video footage of a flock of wild turkeys I ran into while hiking along the southern portion of Sand Bench Trail toward the Court of the Patriarchs. As a matter of fact, I shot a number of video clips using the point-and-shoots as well as my iPhone. These small cameras make it easier to smoothly pan around for video. Heavier SLRs are subject to camera shake when handholding and should really be on a tripod to effect smooth motion.
Regarding point-and-shoot and smartphone cameras and wildlife, based upon my experience trying to get bird shots at the local national wildlife refuge in Texas: Smartphones don’t always do such a great job at getting a still shot of a constantly moving wildlife subject. Some smartphones (like my iPhone) may have a “burst mode” option, which is helpful … if you can remember to use it in the heat of the moment trying to capture a fleeing bird or other animal. Also, point-and-shoot telephoto lenses with large focal lengths (600mm – 1000mm) don’t always equate to stellar close-ups. They can be affixed atop tripods, which is helpful, but those point-and-shoots with huge zooms (called “bridge cameras”) may still produce fuzzy shots from time to time. That’s not to say they won’t give you some nice wildlife images. This is just a caution of which to be aware.
I'm pleased with the resulting images from these non-SLR cameras. I found it necessary to apply edits here and there, but I can now "walk the walk" with these images to demonstrate how well point-and-shoot and smartphone cameras chronicle a national park visit. While I still lugged my SLR, assorted lenses, camera pack, and tripod on my hikes, I appreciated the point-and-shoot's and smartphone's minimal weight with little fuss, as well as their degree of water resistance (well, maybe not so much for the phone). I’m still an SLR-kind of gal, but I'll be pocketing one of those point-and-shoots, in addition to my smartphone, for my April trip to Bryce Canyon National Park. I promise to include more non-SLR shots into future articles.

Winter morning scenery along the Virgin River, Zion National Park / Rebecca Latson


Comments
Good article on a different subject! Appreciate it. Thanks.
Good article with good advice. Thanks for posting.
It's a shame that you did not identify the P&S cameras you used.I have read other articles where the camera (and in the case of DSLRs, the lens) used. I did not in any circumstances infer that as an endorsement of any kind. I just saw what a photographer liked to use. Identifyng the cameras might lead sommeone to look into one or both of them. There can be very good cameras that a person just doesn't think of.